返回首页
公司简介
资质证书
联系我们
我们的产品
我们是一家集研发和制造为一体的现代化高新技术企业,公司创建于2007年.
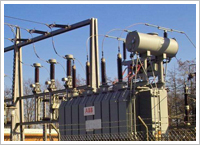
S11-M油浸式三相配电九州官方网站(中国)股份有限公司官网(10kV)
SC(B)11环氧树脂浇注干式九州官方网站(中国)股份有限公司官网
YB□-12/0.4(F·R) 预装式变电站
ZGSF□-3150/40.5 风力发电用变电站
电炉九州官方网站(中国)股份有限公司官网
HXGN□-10(F)固定式金属封闭开关柜
新闻中心
公司拥有雄厚的技术力量,精湛的生产工艺和创新的生产工艺.
直流变换器中微型九州官方网站(中国)股份有限公司官网的电气性能及其应用
2018-6-22
直流变换器中微型九州官方网站(中国)股份有限公司官网的电气性能及其应用
九州官方网站(中国)股份有限公司官网原理
2018-6-20
九州官方网站(中国)股份有限公司官网原理
九州官方网站(中国)股份有限公司官网的发展史
2018-6-19
九州官方网站(中国)股份有限公司官网的发展史
电力九州官方网站(中国)股份有限公司官网发展前景
2018-6-17
电力九州官方网站(中国)股份有限公司官网发展前景
电力九州官方网站(中国)股份有限公司官网定期保养
2018-6-16
电力九州官方网站(中国)股份有限公司官网定期保养
单相九州官方网站(中国)股份有限公司官网在10kV配网中的应用
2018-6-15
单相九州官方网站(中国)股份有限公司官网在10kV配网中的应用
九州官方网站(中国)股份有限公司官网是怎么制作的呢
2018-6-8
九州官方网站(中国)股份有限公司官网是怎么制作的呢
电力九州官方网站(中国)股份有限公司官网防火防爆
2018-6-7
电力九州官方网站(中国)股份有限公司官网防火防爆
联系我们
我们相信没有团结的个人只有团结的团队,让客户满意,让客户放心,全心全意为客户服务,持续改进,不断提升服务品质.
工业园区:上海市金山枫泾工业区建安路48号
总 机:021-56637889
传 真:021-56638003
邮 编:200070
网 址:http://www.jonellisdesign.com
邮 箱:sgob@sgob.com.cn
产品目录
油浸式九州官方网站(中国)股份有限公司官网
/
环氧树脂绝缘干式九州官方网站(中国)股份有限公司官网
/
非晶合金配电九州官方网站(中国)股份有限公司官网
/
预装式变电站
/
光伏发电用变电站
/
风力发电用变电站
/
35KV油浸式九州官方网站(中国)股份有限公司官网
/
特种九州官方网站(中国)股份有限公司官网
/
高、低压开关柜
/
© Copyright 2018 九州官方网站(中国)股份有限公司官网 版权所有 电话:021-56637889 网址:http//www.jonellisdesign.com
沪ICP备2023001347号
沪公网安备 31011602002342号
篮球比赛买球官网
|
乐动平台(中国)有限责任公司
|
国内买球官网
|
欧冠比赛下注平台 (中国)有限公司
|
金沙9500(中国)浙江有限公司
|
博大app游戏平台
|
金沙澳门官方网
|
葡萄新京·最新(中国)官方网站
|
c7官网平台入口(中国)有限公司
|


股份有限公司官网_x.jpg "S11-M油浸式三相配电九州官方网站(中国)股份有限公司官网(10kV)")

股份有限公司官网_x.jpg "SC(B)11环氧树脂浇注干式九州官方网站(中国)股份有限公司官网")
 预装式变电站")

股份有限公司官网_x.jpg "电炉九州官方网站(中国)股份有限公司官网")
_x.jpg "HXGN□-10(F)固定式金属封闭开关柜")